
What is Calibration ?
The calibration is a procedure using test patterns which allows to find the best video settings for the capture card.
DScaler is able to analyze certain test patterns from commercial DVD and then adjust the video settings of the capture card so that the output signal from the capture card is the closest as possible with the real content of the test pattern stored on the disc.
How does it work ?
Types of test pattern
There are three types of test patterns used by DScaler :
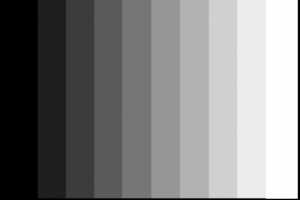
- test patterns that contains only range of grey including black and white,
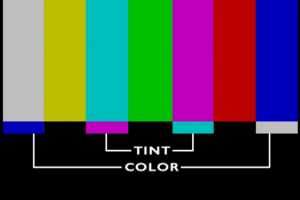
- test patterns that contains only generic colors (red, green, blue, yellow, cyan, magenta, ...),
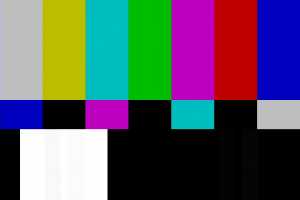
- test patterns that contains a merge of the two precedent types.
the first type of test pattern is used to adjust only brightness and
contrast.
The second type of test pattern is used to adjust only color and hue.
The third type of test pattern allows to do a full adjustment of all video
settings.
Without a test pattern of the third type, the user has to do the calibration
in two steps :
- first adjust contrast and brightness using a test pattern contaning range of gray,
- second adjust color and hue using a test pattern containing generic colors.
Procedure
The user has to do the following actions :
- play one of the referenced test patterns in his player (laserdisc, dvd, ...),
- press pause with the remote control to be sure to have the same signal during the calibration,
- select the corresponding test pattern in the DScaler Hardware menu,
- start a manual calibration and adjust your player left and right cropping to have the drawn analyzed zones correctly centered. This must be done only the first time you use this player for calibration. When it is done, stop the calibration.
- start the calibration choosing between a manual calibration and an automatic calibration,
- if a manual calibration was chosen, adjust the different video settings so that the values on the left and right are the lowest possible, meaning the digitized image is as close as possible as the analog original,
- Stop the calibration when finished.
The video settings must be adjusted in this order :
- brightness,
- contrast,
- color (saturation U + saturation V),
- hue.
During a manual calibration, the user must adjust the different video settings using the "Video adjustements" dialog box or the shortcut keys.
Just after starting a manual calibration, all analyzed zones of the test pattern are drawn with a (black or white) rectangle. You must verify that those zones are correctly centered with the content of your test pattern. All consumer players crop a little the video signal at left and at right. Use the shortcut keys to define the correct left and the right cropping done by your player. You can adjust the overscan used during the calibration too, but this overscan should be normally set to 0. With a correct value for those three parameters, the drawn rectangles should be correctly placed in the video signal.
An OSD is automatically displayed to help the user to decide what to
adjust. The user can show and hide this OSD using Enter and Backspace
keys.
On the left side ; "delta". Difference in RGB colorspace between the reference
values and the ones after the grab process.
On the right side ; same as what is on the left side, but with YUV colorspace.
In the middle ; same info but with a text compound of stars which summarizes
the result; from one star (very bad) to five stars (very good).
Depending on what setting the user is currently tuning, he will work
mainly with :
- black bars for brightness,
- white bars for contrast,
- blue bar for saturation U,
- red bar for saturation V,
- cyan and magenta bars for hue.
During an automatic calibration, the user has nothing to do. Just wait
for DScaler to find the best settings. An OSD is displayed allowing to
see the progress of the operation, and analyzed zones used for the calibration
are drawn in video signal.
At the end, the user can see the new video settings, and a quality indicator
for each analyzed zone of the test pattern shows how good (from one to
five stars) is the card calibration for this zone. He is asked to confirm
if he wants to keep those settings. If he responds "No", the
video settings before calibration are restored.
All those parameters are defined in the section "Calibration" of the ini file.
| Setting | Default | Description |
|---|---|---|
| SourceOverscan | 0 | This is the overscan to be used during calibration. This value must be set to 0, except in very particular cases. |
| LeftPlayerCropping | 8 | This value defines the left cropping done by the player. It is a n/1000 value. 8 means a crop of 0,8% of the video signal. |
| RightPlayerCropping | 16 | This value defines the right cropping done by the player. It is a n/1000 value. 16 means a crop of 1,6% of the video signal. |
| ShowRGBDelta | 1 | This boolean defines if the delta in RGB colorspace have to be displayed in OSD during manual calibration. |
| ShowYUBDelta | 1 | This boolean defines if the delta in YUV colorspace have to be displayed in OSD during manual calibration. |
What do you need ?
You need at least one of the referenced media with patterns and a player connected to the capture card to play the test patterns.
What are the referenced test patterns ?
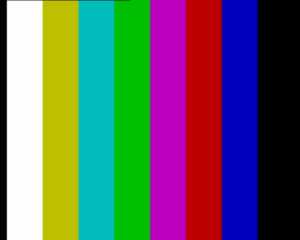
DVD Collector Les Années Laser 2000
|
title 36 chapter 1
 Copyright (c) Les Années Laser |
title 31 chapter 1
 Copyright (c) Les Années Laser |
THX Optimode (Pal)
|
Monitor Performance test pattern
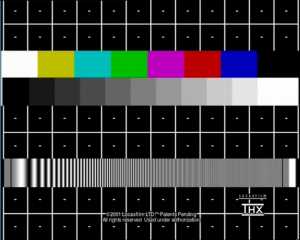 Copyright (c) Lucasfilm Ltd. |
You can find this test pattern on several Pal THX DVD. For instance, "Les Rivières Pourpres" in region 2.
For more informations about the THX test patterns, you can see here.
THX Optimode (Ntsc)
|
Monitor Performance test pattern
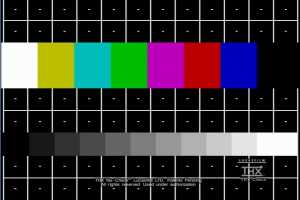 Copyright (c) Lucasfilm Ltd. |
Tint Color test pattern
 Copyright (c) Lucasfilm Ltd. |
You can find those test patterns on several Ntsc THX DVD. For instance, "Toy Story Ultimate Toy Box" in region 1.
For more informations about the THX test patterns, you can see here.
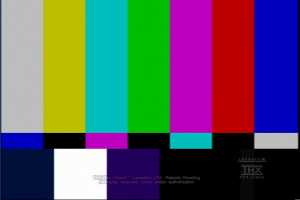
DVD Video Essentials
|
title 18 chapter 2
 Copyright (c) Joe Kane Productions Inc. |
tile 15 chapter 5
 Copyright (c) Joe Kane Productions Inc. |
For more informations about the Video Essentials disc, you can see here.
DVD AVIA
|
title 1 chapter 7
 Copyright (c) Ovation Software |
tile 4 chapter 4
 Copyright (c) Ovation Software |
For more informations about the AVIA disc, you can see here.